Saturday, February 4, 2012

Facelift

After living in our first home for over two years, I finally decided it was time to turn our "nothing room" into an office type space. After painting the room and making things look nice...our $2 garage sale somewhat beat up file cabinet just didn't make the cut. I decided to attempt to give it a little facelift. In honor of my new found obsession with Pinterest, I documented the process for anyone out there who may have an ugly little cabinet of their own :)

 The original eyesore in all its glory. Minus the handles which pop out easily (next photo) - I'm no file cabinet expert, but my assumption is the majority of this style have handles that can be removed easily. You'll want to remove them to prep the cabinet for painting.


For my cabinet, I chose a spray paint meant for multi surfaces. Krylon is good stuff. ($6.99 at Michaels, I later realized it was $3.99 at Walmart). I used Avocado (satin finish as I did not want a glossy shiny cabinet). Prior to spray painting, I removed the handles and lightly sanded the entire cabinet (I didn't waste my time and effort with the back or bottom - same with painting). Use a fine grit paper as you do not want lines showing through the paint from rough sanding. Be sure to wipe your cabinet clean prior to spray painting.
 After sanding and wiping clean, you are ready for painting. Now, if I had been interested in being more thorough and not just quick...I would have used a primer spray paint prior as there are spots that the original paint has chipped off (more obvious after sanding) that the spray paint covered differently despite a few coats. So if you have the time...go for priming it first. Because I spray painted in the garage in the winter, my first coat ran a little. No sweat if this happens...just lightly dab it with a cloth to remove the run lines..and your next coats should stick and cover any blot marks you made.
 After my cabinet was painted and dry (I allowed 24 hours despite it being dry to the touch) I was ready to move on to giving the doors a pop. The scrap booking section at Michaels offers a HUGE array of decorative card stock papers. In fact, the hardest thing about this project was choosing the card stock to use. I went with that pictured...which was on clearance for 15 cents a piece (you'll obviously need one piece per drawer). Pretty much a steal. To bind the paper to the drawers I used Elmers craft adhesive (a spray, $5.99 at Michaels).

 Next step is to decide the placement of your paper. You can eyeball it or measure. I did a bit of both again due to my wanting this to just be a quick fix. I marked the placement on the door with a pencil making little L's at the corners so I could easily and quickly put it the right spot when covered with adhesive.

 Next, I trimmed the excess paper I did not need. I wanted a good straight line, so I used a trimmer. This one I had, but was purchased at Wal-mart for about $11.99 I think.

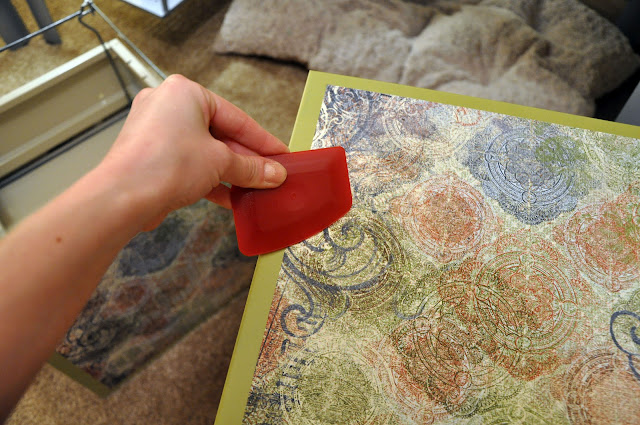
After trimming the excess, I marked which side was the top on the back of the paper so the measurements matched as well as the design one each drawer. Wipe your drawer lightly to remove color dust that will probably be there after spray painting. Now you're ready for adhesive. Shake the can well, coat the back of your paper generously (put something underneath to protect your workspace) and apply immediately do your drawer. I started from the bottom, lining up the corners on the L marks I previously made and edging out any air bubbles (you can use anything sturdy and straight that you have to do this, a credit card would probably work well...I used a utensil I have for cleaning iron skillets (pictured below)). Don't push too hard, you don't want to tear your paper, pay close attention to the corners and edges so they are sure to dry flat to the surface.


 After you have adhered your card stock, you're left with what is pictured above. You'll now need to prep to put back your handles.

 From the inside of your drawer, you are left with this. You can see and easily cut the paper to allow you to put the handles back on, by using some type of precision cutting tool (this is why I did not precut the holes prior to adhering...why make placing the paper any more difficult than necessary). You'll want to leave a little paper left on each side of your handle opening that you can fold over to the inside of the drawer so when you add your handle back, you have a nice clean finish. 
 Place your handles back...I found it easiest to place the bottom and then the top, making sure the paper you folded over is inside the groove of the handle so it does not show on the outside.
Voila, a 24 hour facelift for under $15. Can't beat that... I am pleased with the turnout and glad I decided to spend the time to make it look a little better!!

Wednesday, November 16, 2011

iphone pictures...

Temporarily fill my overwhelming need to capture in a photo everything in my life that makes me smile, even though the final product is typically lacking in basic quality.

This week my time is filled as it typically is - driving through the UP and Northern WI to go and photograph school pictures. Yes, school pictures...the ones we ALL dreaded (after a certain age anyway). But there is one thing different this week than others. This week, my other half is out in the woods, the cold, sitting in a small tent like shelter on a small stool - all in hopes that he will encounter a prize Buck and further prove his "man of the house" status by bringing home the "bacon" (regardless the fact that we still have a freezer full of venison that a family of two simply cannot go through fast enough). All lady sarcasm and joking aside, it pleases me to see him so excited, so prepared, so...manly :)

So when my dark Tuesday morning drive finally woke the sun to a fiery hunter orange sunrise, I could not help but smile to myself. Smile, and realize that even the morning sky was excited for opening day and welcoming hunters out in the woods in the best way it knew how. And once the sun awoke and I could see other travelers on the road, it made me smile even more to realize most of the other 6 a.m. morning traffic was 4x4 trucks loaded with four-wheelers complete with gunboots, turning off of the hwy onto tiny little dirt roads that lead no where but into the woods. Now, I'm not a hunter, and it does not please me to know that beautiful creatures all over the UP are going to be "taken down" during their breakfast - I stand firm behind my saying "the only animal I will shoot will be with a 300 mm Nikkor lens", and I further do not enjoy seeing the evidence of such take downs all over town frozen and stiff in truckbeds (or worse, strapped to the top of the cab) in the parking lots of innocent places like the grocery store. BUT, what made me smile was knowing that somewhere out there, my favorite person in the entire world was too heading out to embark on for what he has been prepping so intently, and I thanked the sky for giving him such a beautiful welcome. I wished him silent luck, and then I even more silently wished for the deer to run...run fast.


The little smiles for the day, however, did not end for me after my drive was over. School photography, as one could assume, is a love/hate relationship. Some days, the kids are adorable, and well behaved, and did I say adorable? But other days, they are infuriating, badly behaved, and, well...did I mention infuriating? The particular school(s) I was headed to on this particular morning is on my top 5 list of badly behaved and difficult schools. In addition to this, it a school where I cannot park near where I will be set up to unload my equipment (and there's plenty, three trips worth). So generally, by the time I am finished photographing and needing to load up to head out, I am even LESS thrilled about having to lug all of my stuff back out to where my car is parked. But something for me went differently this day. As I was hauling all of my gear out several sets of doors, a nice gentleman teacher held a door open for me, assessed the situation, and returned seconds later with two kiddos to "help". At the very same moment, two more boys came running out yelling that they wanted to help, and then two more...ultimately until there was too many little helpers for the number of things to carry (some settled on doubling up to carry one bag). Now it is a very small thing, but this happening utterly and completely MADE my day, and made me smile (even now) thinking about how adorable my slew of little helpers were. Thank you to the mothers out there who are still making it a point to raise little gentlemen!
There were about three more that didn't make the picture because I took it quickly over my shoulder. Adorable.

Tuesday, October 25, 2011

"Falling" into Winter


Lately I feel like I don't have enough hours in a day (and yet, I know I nap and watch reality TV WAY more than necessary). It seems I woke up and Fall was in full swing, only to wake the next morning to Autumn "falling" off the grid. I was so fortunate this year to see Autumn at its finest in an array of places. And it made driving all over the UP and Northern WI (for my day job) not nearly as much of a chore. I found myself actually driving under the speed limit most days to be able to take in what I was being fortunate enough to see.

But alas, last week I noticed what a major difference a few days (and absurd wind storms) can make, because my beautiful morning drives are now barren and lonely looking. I was pleased to see some color still in burst near the bridge late last week, but for the most part.... I fear it is time to bid Autumn a farewell, and brace myself for my polite but somewhat fake welcome to Winter.

So... in honor of my second favorite time of the year.... Here are a few photos of this year's beauty from my home area, and also my drives all over the UP and Northern WI.


 Until next year...................

Monday, September 26, 2011

Modern Day Vintage


As I begin branching out more in my photography to include photographing people and not just the nature that I love so much, my mind is constantly filled with themes, ideas, locations, outfits, props...etc (I'm not going to lie, I keep a little notebook with me filled with these goodies). What better way to play around with some of these ideas than on willing friends :). My friend, Tori, is beautiful on any day, but she was radiant for this "folk inspired" vintage shoot. It was really just somewhat random that I used Tori for this set, but I don't think anyone else could have been any more perfect. I only wish I had a better laptop right now to keep editing more images from her shoot (and so that the ones edited would be that much better, as my current laptop set is..well...lacking), because there was very few "unworthy" photos.

Thanks again, Tori, for being my guinea pig for a couple of hours!


Thursday, September 1, 2011

"Sailing" into Another Year!


Two weeks ago, the hubster and I celebrated our one year anniversary (of marriage that is). We were blessed with a beautiful day that we put to use by taking a sail on the Coaster II around the harbor. The day was further on our side when we lucked out by being the only two people for that afternoon's sail. Captain Nico, of the Coaster II, is a calm and soft spoken man, and he made us feel right at home on the boat. We were able to, and actually encouraged to, move about and enjoy the boat during the sail. We also packed a little lunch and snack to enjoy, as we were out on the water for two hours. It was a treat to be able to see the city from a view we don't typically get to see, learn the history of the boat, and watch the crew (Nico, his son, and another young guy). Mostly, it was great to share a new experience for our one year anniversary.

After our sail, we stuffed our faces at Elizabeth's Chop House (um...YUM), and then headed home to stuff our faces even more with an anniversary cake courtesy of Joe's Cakes. Joe is an amazing local cake baker/designer, and who we tried to book for our wedding to no avail. In passing, we mentioned this to Joe at a recent wedding and as a consolation prize (so to speak) he gifted us an anniversary cake!! AMAZING (if you have had his cakes, you obviously agree). No worries, we still planned on eating our freezer burned wedding cake in true anniversary tradition. We treated ourselves to Joe's cake on Saturday (the day of our sail and dinner), and ate our wedding cake on Sunday (our true anniversary). I won't lie, I feel guilty saying this... but our year old cake was amazing (as was Joe's, but I don't need to reiterate that for most).

What an amazing weekend! Beautiful weather, a sail, wonderful dinner, TWO cakes, but most importantly time with the hubbs and a toast to many more years to come. Did I mention TWO cakes? ;)


<3

Watching the sky and top sails. So relaxing

Raspberry Bomb - Thanks Joe!