After living in our first home for over two years, I finally decided it was time to turn our "nothing room" into an office type space. After painting the room and making things look nice...our $2 garage sale somewhat beat up file cabinet just didn't make the cut. I decided to attempt to give it a little facelift. In honor of my new found obsession with Pinterest, I documented the process for anyone out there who may have an ugly little cabinet of their own :)
The original eyesore in all its glory. Minus the handles which pop out easily (next photo) - I'm no file cabinet expert, but my assumption is the majority of this style have handles that can be removed easily. You'll want to remove them to prep the cabinet for painting.
For my cabinet, I chose a spray paint meant for multi surfaces. Krylon is good stuff. ($6.99 at Michaels, I later realized it was $3.99 at Walmart). I used Avocado (satin finish as I did not want a glossy shiny cabinet). Prior to spray painting, I removed the handles and lightly sanded the entire cabinet (I didn't waste my time and effort with the back or bottom - same with painting). Use a fine grit paper as you do not want lines showing through the paint from rough sanding. Be sure to wipe your cabinet clean prior to spray painting.
After sanding and wiping clean, you are ready for painting. Now, if I had been interested in being more thorough and not just quick...I would have used a primer spray paint prior as there are spots that the original paint has chipped off (more obvious after sanding) that the spray paint covered differently despite a few coats. So if you have the time...go for priming it first. Because I spray painted in the garage in the winter, my first coat ran a little. No sweat if this happens...just lightly dab it with a cloth to remove the run lines..and your next coats should stick and cover any blot marks you made.
After my cabinet was painted and dry (I allowed 24 hours despite it being dry to the touch) I was ready to move on to giving the doors a pop. The scrap booking section at Michaels offers a HUGE array of decorative card stock papers. In fact, the hardest thing about this project was choosing the card stock to use. I went with that pictured...which was on clearance for 15 cents a piece (you'll obviously need one piece per drawer). Pretty much a steal. To bind the paper to the drawers I used Elmers craft adhesive (a spray, $5.99 at Michaels).
Next step is to decide the placement of your paper. You can eyeball it or measure. I did a bit of both again due to my wanting this to just be a quick fix. I marked the placement on the door with a pencil making little L's at the corners so I could easily and quickly put it the right spot when covered with adhesive.
Next, I trimmed the excess paper I did not need. I wanted a good straight line, so I used a trimmer. This one I had, but was purchased at Wal-mart for about $11.99 I think.
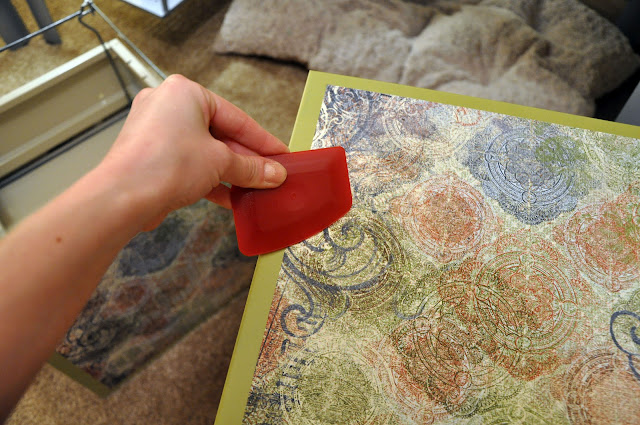
After trimming the excess, I marked which side was the top on the back of the paper so the measurements matched as well as the design one each drawer. Wipe your drawer lightly to remove color dust that will probably be there after spray painting. Now you're ready for adhesive. Shake the can well, coat the back of your paper generously (put something underneath to protect your workspace) and apply immediately do your drawer. I started from the bottom, lining up the corners on the L marks I previously made and edging out any air bubbles (you can use anything sturdy and straight that you have to do this, a credit card would probably work well...I used a utensil I have for cleaning iron skillets (pictured below)). Don't push too hard, you don't want to tear your paper, pay close attention to the corners and edges so they are sure to dry flat to the surface.
After you have adhered your card stock, you're left with what is pictured above. You'll now need to prep to put back your handles.
From the inside of your drawer, you are left with this. You can see and easily cut the paper to allow you to put the handles back on, by using some type of precision cutting tool (this is why I did not precut the holes prior to adhering...why make placing the paper any more difficult than necessary). You'll want to leave a little paper left on each side of your handle opening that you can fold over to the inside of the drawer so when you add your handle back, you have a nice clean finish.
Place your handles back...I found it easiest to place the bottom and then the top, making sure the paper you folded over is inside the groove of the handle so it does not show on the outside.
Voila, a 24 hour facelift for under $15. Can't beat that... I am pleased with the turnout and glad I decided to spend the time to make it look a little better!!


